
In this simple guide, I’m going to show you how to change your Squarespace template. Instructions are provided for both Squarespace 7.0 and Squarespace 7.1 — so before we dive in, let’s take a look at how to find out which version your site is built on.
How to find out which version of Squarespace you’re using
There are two versions of Squarespace currently available, 7.0 and 7.1 — and the processes involved in changing templates vary considerably depending on which one you’re using.
To find out which version of Squarespace your site has been built on, just go to your Squarespace dashboard and click on Website > Pages. At the bottom of the menu panel that appears (under the ‘Utilities’ section), you’ll then see a label informing you whether you’re on version 7.0 or 7.1 of the platform.
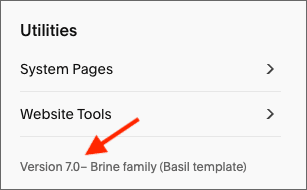
Once you know what template you’re using, you can follow the appropriate steps to change templates. We have instructions for both 7.0 and 7.1 templates available — you can use the below links to access them quickly:
Changing templates in Squarespace 7.0
You have two options when it comes to changing templates in Squarespace 7.0:
- switching to another Squarespace 7.0 template
- migrating your site to Squarepace 7.1.
Let’s look at both in turn.
Switching to another Squarespace 7.0 template
Switching from one Squarespace 7.0 template to another is a fairly straightforward process.
In your Squarespace dashboard, you go to the ‘Website’ section and then click ‘Design.’
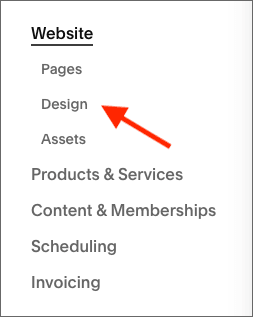
Then, you need to choose the ‘Template’ option.
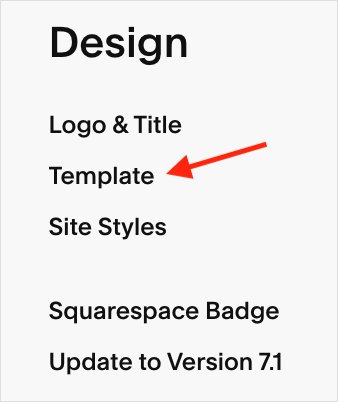
After that, click the ‘Install New Template’ button.
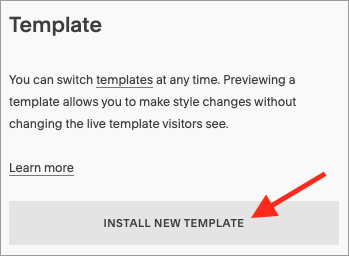
You will then be prompted to pick a new template to install (see screenshot below). You can use the filters provided to browse templates by category.
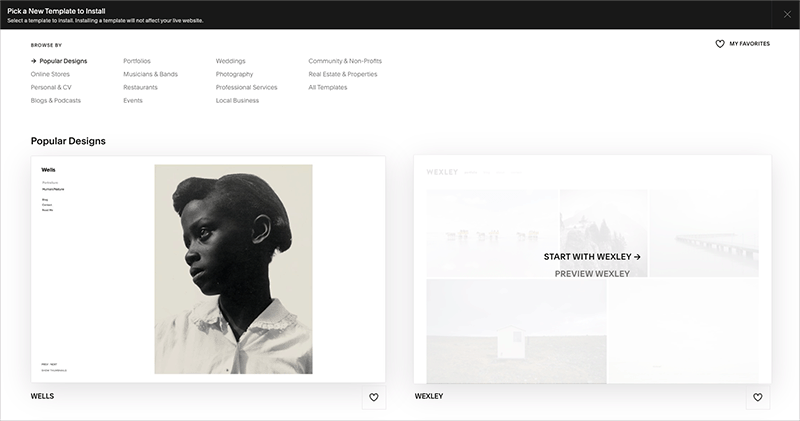
Once you’ve picked a template, it will appear in the list of installed templates on your Squarespace site (in the Website > Design > Template section). Hovering over this will give you the option to preview it on your site.

Now, when you preview a Squarespace 7.0 template, you should note that demo content will be added to your site’s architecture (but thankfully not your existing live site!). You can remove these demo pages during the preview phase and make any other necessary changes to your site’s navigation and template design.
Throughout this process you’ll see a message at the bottom of the screen giving you the option to either cancel the preview, or set the template as your live one. Once you’re finished making changes, click the ‘Set as Live Template’ button to make them permanent (see screenshot below).

(Helpfully, you can revert back to your previous template at any point in Design > Templates — so long as you haven’t uninstalled it).
Migrating your site to Squarespace 7.1
The other way to change template in Squarespace 7.0 is to leave that version of the platform entirely and switch to Squarespace 7.1.
To do this, you’ll need to:
- Start a new Squarespace trial
- Choose a 7.1 template during the setup process
- Migrate all your content across from Squarespace 7.0 to 7.1
- Ensure that any scripts — cookies, Google Analytics etc. — have been copied across to the 7.1 website.
- Change your Squarespace domain settings so that your domain name is mapped to your new site.
There are a lot of good reasons to make the move. Squarespace version 7.1 is generally faster than 7.0; meets Google’s Core Web Vitals standards more often; contains considerably more features; and unlike 7.0 will be developed more actively by Squarespace in the years to come.
So in general, switching from a 7.0 site template to a 7.1 one brings a lot of good stuff to the table!
However, doing this is not just a case of changing templates: it’s technically a full site migration — something that can have quite significant SEO implications.
Accordingly, if you go down this route, it’s important to proceed cautiously. Here are a few tips on how to migrate safely:
- Make sure you read Squarespace’s 7.0 to 7.1 migration guide before starting the migration process — and follow the steps it outlines carefully.
- Ensure that all the URLs on your new site match those on the old 7.0 one — or that you’ve created 301 redirects for them (you can learn how to create 301 redirects in Squarespace here). Generally speaking, it’s better not to change URLs unless you really have to.
- Don’t cancel your Squarespace 7.0 site until you are 100% certain that all content has been transferred to the 7.1 version successfully, all URLs are continuing to work properly and that there are no other technical issues with your new website.
Changing templates in Squarespace 7.1
When it comes to switching templates in Squarepace 7.1, the situation is a bit confusing.
At first glance, it seems as though different templates exist — you pick one when starting your trial — but in truth, there is only one core template available for Squarespace 7.1, and the individual ones you encounter are actually versions of that template with different colors, content layouts or fonts applied. And frustratingly, once you’ve built your Squarespace 7.1 site, there’s no way to switch between the templates you encountered when creating your account.

Instead, you can either:
- Reformat your 7.1 template so that it matches the design used by another one.
- Rebuild your site on a new Squarespace 7.1 template.
Let’s look at both options now.
Reformatting your Squarespace 7.1 template
If you want to make a Squarespace 7.1 template look like a different one, this is technically possible — but can be very time consuming.
Simply put, you will have to compare your installed template with the one you’d ideally like to swap it for — and copy all the design settings from the new one to the existing one.
This will involve:
- Changing the colors, fonts, and other site styles for your site in the Squarespace ‘Site styles‘ panel
- Adding new pages with relevant pre-built page layouts.
- Adding new sections to change a page’s layout.
- Using section styles to override site-wide styles.
- Creating custom layouts for your page content using summary blocks.
A lot of work, in other words! Accordingly, many Squarespace 7.1 users opt to change templates by building their site again from scratch — i.e., by starting a brand new Squarespace 7.1 site, picking their preferred template and moving all their existing content over to it.
Let’s take a look at what’s involved with that.
Rebuilding your site on a new Squarespace 7.1 template
If you really can’t be bothered with tweaking an existing 7.1 site so that its template matches a different one that you really like, then there’s always the option of starting a fresh Squarespace site and moving all your existing content to it.
This is generally okay if you’re dealing with a relatively new and small website — and totally fine if you’re dealing with a site that you’ve yet to put live.
However, if you have a large, established Squarespace 7.1 website, you’ll need to tread more carefully. This is because technically speaking, moving all your content over to a new Squarespace 7.1 site is technically a site migration — meaning there’s a lot more moving parts and more scope for things to go wrong (especially from an SEO perspective).
If you decide to go down this route, the process is generally as follows:
- Start a Squarespace trial.
- Select your desired template (you’ll be presented with 7.1 templates by default).
- Copy all your pages, posts and products from your old site to your new one.
- Ensure that any scripts — cookies, Google Analytics etc. — have been copied across to the new website.
- Change your Squarespace domain settings so that your domain name is mapped to the new site.
As part of this,
- Ensure that all the URLs on your new 7.1 site match those on the old one — or that you’ve created 301 redirects for them (you can learn how to create 301 redirects in Squarespace here). Generally speaking, it’s better not to change existing URLs unless there’s a really good reason for doing so.
- Don’t cancel your old Squarespace site until you are 100% certain that all content has been transferred to the new version successfully and that there are no technical issues with it.
And that’s it — your guide to switching templates on Squarespace! Good luck changing template and if you have any queries, please do feel free to leave them in the comments section. We read all questions, and will do our best to help.
Switching templates in Squarespace — FAQ
Can you change your template in Squarespace?
If you’re using Squarespace 7.0, it’s easy to change site template (via Website > Design > Templates > Install New Template). In Squarespace 7.1 you can’t change templates, but you can restyle your existing template to match a different one, or start a new Squarespace site with a different template and move all your existing content over to it.
How do I use a different template in Squarespace?
It depends on which version of Squarespace you’re using. In Squarespace 7.0, it’s a simple case of going to Website > Design > Templates > Install New Template and then choosing a new template for your site from the range provided. In Squarespace 7.1, it’s not technically possible to switch templates, but you can restyle your template so that it matches the look and feel of another one, or start a brand new site using a brand new template and copy all your content across to it.
Does changing Squarespace templates affect SEO?
Potentially, yes. Squarespace 7.1 templates load more quickly and typically meet Google’s Core Web Vitals requirements more reliably, so switching from Squarespace 7.0 to 7.1 can bring some technical SEO improvements. The other impact of changing Squarespace templates from an SEO perspective involves content migration — if you move content from Squarespace 7.0 to 7.1 and remove pages or change page URLs (without creating 301 redirects), you can hurt your search rankings.
How do I know which Squarespace template is being used on my site?
To find out which Squarespace template you’re using in Squarespace 7.0, go to Website > Pages and scrolling down to the bottom of the menu that appears. You’ll see your template name there. In Squarespace 7.1, you can only see what version of the platform you’re using — you can do this by going to Website > Pages and scrolling down to the bottom of the menu too.
No comments